What is bleed, and how much does a deck need?
Bleed is extra art you extend past the edge of the card so nothing white shows after cutting. Card bleed explained simply: printers cut through a stack with a small margin of error, so you paint about 0.125 inch beyond the trim on every side. For a standard tarot card, that turns an 825 x 1425 px file into roughly 897 x 1497 px at 300 DPI.
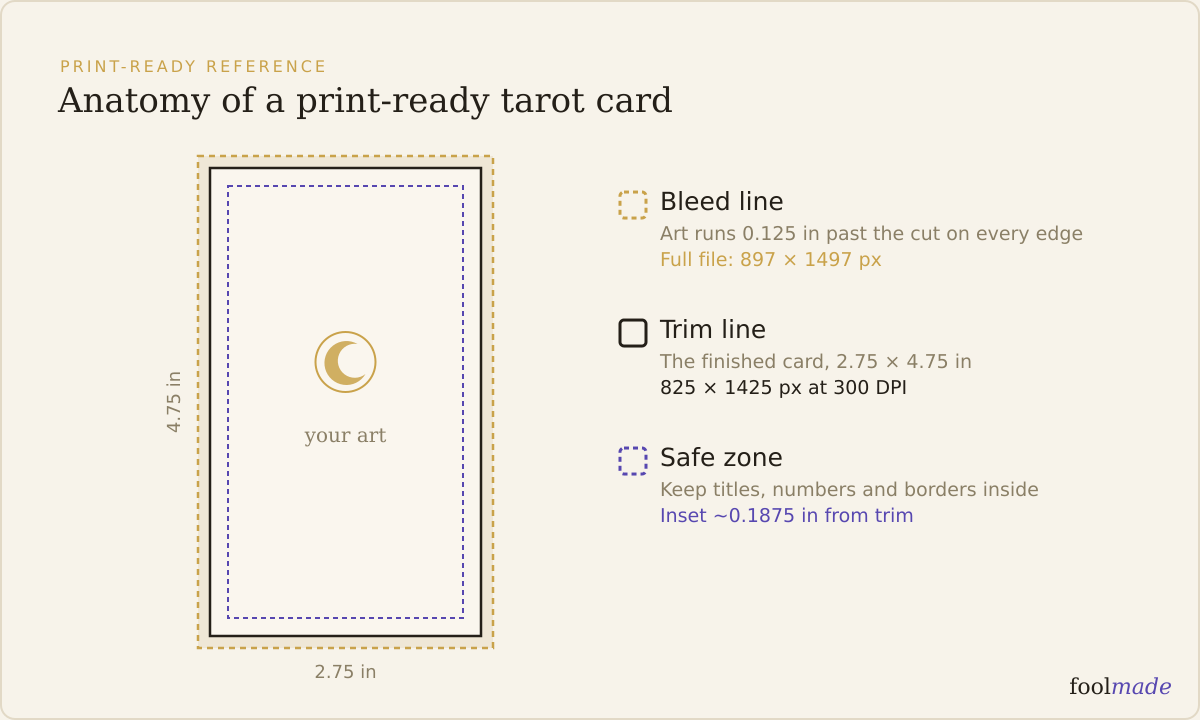
That sliver is not part of the finished card. The cutter trims it off. It exists only so the blade has somewhere to land that is still your artwork and not bare paper.
Skip bleed and you risk a thin white line on one edge of your printed deck. Add it wrong and your borders go crooked. Both are reprint-money mistakes.
What does bleed actually mean on a card?
Three lines matter on every card file. All three are different sizes. Bleed is the outermost: art that runs past the card so the cut never reaches bare paper.
Picture three nested rectangles. The outer edge is where your art stops. Inside that is the trim line, where the blade is supposed to cut. Inside that is the safe zone, where anything you cannot afford to lose has to live.
Printers cut hundreds of cards in a stack, and the stack shifts by a fraction of a millimeter. That drift is why the trim line is a target, not a guarantee. Bleed and the safe zone are the two buffers that absorb drift on both sides of the cut.
| Layer | What it is |
|---|---|
| Bleed | The art extended past the trim, about 0.125 in each side, that gets cut off. It stops white edges when the cut drifts outward. |
| Trim line | Where the blade is meant to cut. This is your finished card size, 2.75 x 4.75 in for standard tarot. |
| Safe zone | The inner margin, about 0.125 in inside the trim, where titles, faces, and borders must stay so they never get sliced. |
How much bleed does a tarot deck need?
Most card printers want 0.125 inch of bleed on all four sides. A few ask for 3 mm, which is close enough to the same thing. Always confirm the exact number in your printer's template before you export. It is the one spec that varies.
At 300 DPI, 0.125 inch works out to about 37 px per side. Add that to all four edges of a standard 825 x 1425 px card and your full-bleed file lands at roughly 897 x 1497 px.
Here is the standard tarot card as a full stack of numbers at 300 DPI.
| Measure | Inches | Pixels at 300 DPI |
|---|---|---|
| Bleed size (full file) | 3.0 x 5.0 in | ~897 x 1497 px |
| Trim size (finished card) | 2.75 x 4.75 in | 825 x 1425 px |
| Safe zone (inner) | 2.5 x 4.5 in | ~750 x 1350 px |
If your printer lists a different card size or a 3 mm bleed, rebuild these numbers from their spec. The method is the same: start at the trim, add bleed outward, pull the safe zone inward. For the full unit-by-unit breakdown of the card itself, see tarot card size and dimensions.
Where is the trim line and the safe zone?
The trim line is your finished card edge, 2.75 x 4.75 inches. It is the size the buyer holds. Everything from the trim line outward is bleed and gets thrown away. Everything from the trim line inward is the printed face.
The safe zone sits about 0.125 inch inside the trim. Keep card titles, numbers, key faces, and any framing border inside it. If the cut drifts toward the center, a title parked right on the trim can lose its top row of pixels. There is no fixing that after the run.
You are designing for two kinds of drift at once. Bleed protects you when the blade cuts a hair outside the line. The safe zone protects you when it cuts a hair inside.
Why are borders the trap?
A full-bleed illustration hides cutting drift beautifully. The art already runs off every edge, and a small shift just trims a little more or less background. Nobody notices. A thin, even border is the opposite. It shows every millimeter of drift.
Picture a card with a 3 mm white frame around the art. If the cut drifts even slightly, that frame becomes 4 mm on the left and 2 mm on the right. The eye reads uneven borders instantly, and across 78 cards it looks like a printing defect even when your file was fine.
If you want borders, make them thick enough to survive drift, keep them well inside the safe zone, and accept that they will never be perfectly even across a full deck. Symmetrical, thin frames are the single most common reason a technically correct file still looks off in hand. The same logic applies to card backs, which is why the print-ready checklist treats borders and backs as their own preflight step.
How do I add bleed to my file?
Set your canvas to the full bleed size before you start, not after. Building at 825 x 1425 px and trying to add bleed later means stretching or repainting edges, and it never looks clean.
1. Create the canvas at the bleed size, about 897 x 1497 px at 300 DPI for a standard tarot card.
2. Place guides at the trim line, 37 px in from each edge, so you can see your real card edge.
3. Place a second set of guides at the safe zone, about 37 px inside the trim.
4. Run background art, textures, and full illustrations all the way to the outer canvas edge.
5. Keep titles, numbers, faces, and borders inside the safe zone guides.
6. Export the whole canvas flat at 300 DPI, bleed included. Do not crop to the trim.
Printer templates hand you these guides already placed, which is why starting from the right template saves the most grief. You can pull the correct dimensions for common printers from tarot card templates and sizes and build on top of them.
Frequently asked questions
How much bleed do tarot cards need?
About 0.125 inch on all four sides, roughly 37 px per side at 300 DPI. Some printers spec 3 mm instead. Check your printer's template, because it is the one number that changes between them.
What size is a tarot card file with bleed?
A standard 2.75 x 4.75 inch card becomes about 3.0 x 5.0 inches with bleed, or roughly 897 x 1497 px at 300 DPI. The visible trimmed card stays 825 x 1425 px.
What happens if I forget to add bleed?
The blade can cut into bare paper, leaving a thin white line along one or more edges. Printers will often reject a no-bleed file or auto-add a white border, so you either get flagged or ship a flawed deck.
Is bleed the same as the safe zone?
No. Bleed is art outside the trim that gets cut off. The safe zone is the margin inside the trim where important art must stay. They are opposite buffers on either side of the cut line.
Do I still need bleed if my art does not reach the edge?
Yes. Even a centered illustration on a solid background needs that background extended past the trim, or drift will expose white. Bleed protects the edge regardless of where your focal art sits.
The bottom line
Bleed is cheap insurance. Build your canvas at the full bleed size, run backgrounds off every edge, and keep the parts that matter inside the safe zone. Get those three layers right once and every card in the deck comes back clean.
Before you send a run, it helps to see the trim, bleed, and safe zone flagged on each card instead of eyeballing them. Foolmade's print check reads your files and shows where your bleed and safe zones actually fall, so a white edge is something you catch on screen and not in a box of 500 printed decks.