Print ready tarot cards: the pre-flight checklist
Print ready tarot cards are files that match your printer's exact size, sit at 300 DPI, carry about 0.125 inches of bleed on every edge, and hold all 78 cards to identical dimensions. Get those numbers right and the deck comes back clean. Miss one and you pay for a reprint or ship a flawed run.
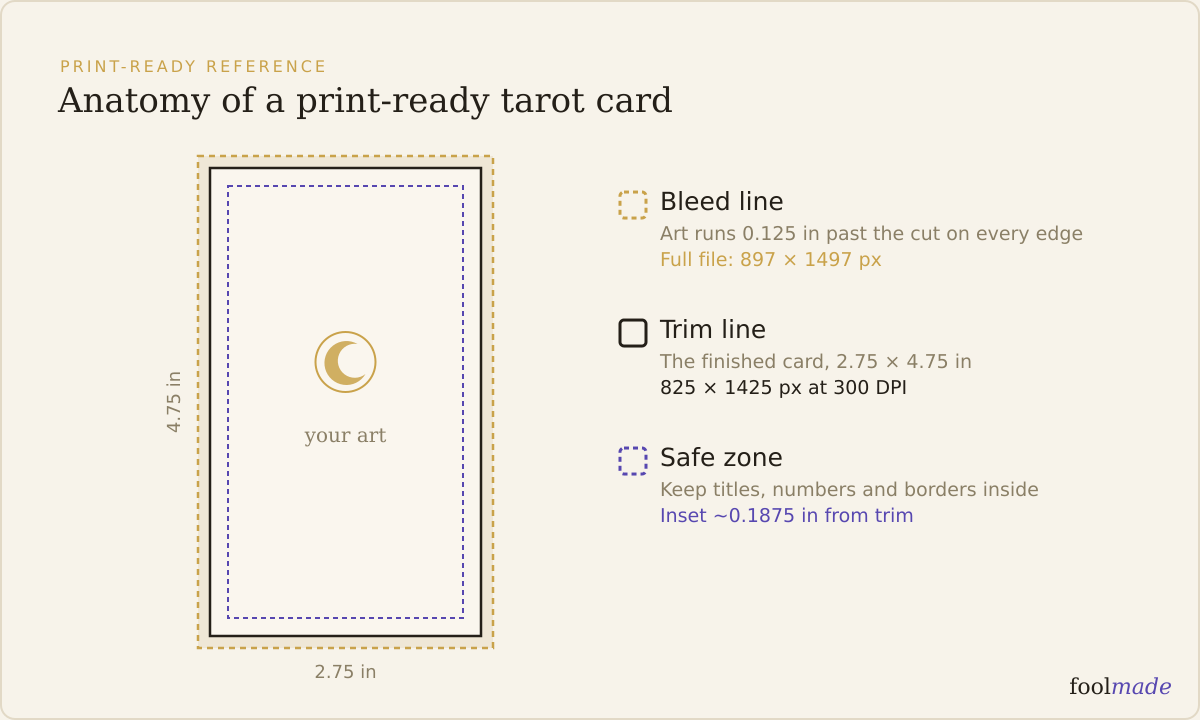
A file that looks perfect on screen can still be wrong for print. Screens forgive low resolution, missing bleed, and stray color profiles. A cutting blade and a press do not. This checklist is the gap between "my art is finished" and "my deck is ready to send."
What does "print ready tarot cards" mean?
Print ready means a printer can take your files and produce the physical deck with no changes and no guesswork. Nothing to resize, no bleed to add, no color profile to fix.
Most first-time makers think finished art equals a finished deck. It does not. The art is one layer. The other layer is a set of boring technical rules about pixels, edges, and color that decide whether the print matches what you painted.
The good news: there are only about six things to check. Once you understand each one, running the check on all 78 cards takes an afternoon, and it saves the most expensive mistake in self-publishing: a full print run that comes back wrong.
The print ready tarot cards checklist
Here is every check, what it means, and what breaks if you skip it. These are the standard values for a 2.75 x 4.75 inch tarot card. Your printer publishes its own template, so treat this as the target and confirm the exact numbers against that template before you export.
| Check | What it is | What breaks if you skip it |
|---|---|---|
| 300 DPI, 825 x 1425 px final | Resolution high enough to print crisply. At 300 dots per inch, a 2.75 x 4.75 in card is 825 x 1425 pixels of visible art. | Art prints soft, pixelated, or blurry. A 150 DPI file looks fine on screen and comes back fuzzy on card. |
| Bleed, ~0.125 in per side (~897 x 1497 px) | Background art extended past the trim line so the cut always lands on art, never paper. | A slightly off cut exposes a thin white sliver on one edge of the card. |
| Aspect ratio 2.75 : 4.75 | The width-to-height proportion of a standard tarot card. Every card must share it. | Cards get stretched or squashed to fit, or the printer crops your art to force the shape. |
| A card back | One back design, sized and bled exactly like the fronts, printed on all 78 cards. | No deck. A face-only file is not a deck, and a back at the wrong size ruins the feel in-hand. |
| All 78 the same size | Identical trim, bleed, DPI, and orientation across every card in the deck. | The deck feels wrong shuffled together, and the printer may reject or trim the batch unevenly. |
| sRGB color | A standard color space most card printers expect for upload. | Colors shift on print. Reds go muddy, blues go flat, and the deck does not match your screen. |
Run every card against all six. One card that fails any row can hold up the whole order.
What DPI and size do print ready tarot cards need?
300 DPI is the resolution nearly every card printer expects, and it is the floor, not a bonus. At 300 dots per inch a standard tarot card is 825 x 1425 pixels of visible art. The math is just inches times DPI: 2.75 x 300 = 825 wide, 4.75 x 300 = 1425 tall.
Check the DPI of your actual export, not the setting you meant to use. Design apps happily let you build at 72 DPI and it looks identical on screen. The difference only appears on the printed card, as a soft or jagged image.
Size and resolution travel together. If your card is not 825 x 1425 px (before bleed), either your dimensions are off or your DPI is. The full breakdown in every unit, inches, millimeters, and pixels, lives in the tarot card size and dimensions guide.
How much bleed does a tarot deck need?
About 0.125 inches on every edge, which is roughly 37 to 38 extra pixels per side at 300 DPI. That turns your 825 x 1425 px card into a full-bleed file of about 897 x 1497 px.
Bleed exists because no cutter is perfect. A blade slicing 78 cards lands a hair off every time. If your background stops exactly at the trim line, one off cut shows the bare paper as a white edge. Extend the art past the trim and the cut always hits color instead.
Keep your important content, titles, numbers, borders, and faces, pulled in from the edge too. That inner margin is the safe zone. If you want the trim line, bleed, and safe zone explained in full, read what is bleed and how much does your deck need.
Why do the printed colors look wrong?
Because your screen glows and paper does not. Monitors show color in RGB light. Presses lay down ink, and many cards print through a CMYK process, so bright screen colors that ink cannot reproduce get pushed to the nearest printable version. That is why a vivid screen red can come back dull.
Most card printers ask you to upload in sRGB, a specific RGB color space, and they handle the conversion. Do not convert to CMYK yourself unless your printer explicitly tells you to, because a bad conversion looks worse than letting them do it. What matters for a clean check: work and export in sRGB, and expect some shift on the most saturated colors.
If you want to know exactly what changes and why, RGB vs CMYK for tarot cards walks through the color shift and how to plan for it.
Does your deck have a proper card back?
A deck is fronts plus a back, and the back is a full card that has to pass the same checks. Same size, same bleed, same DPI, same color space. It prints on every one of the 78 cards, so a back at the wrong dimensions is a deck-wide problem.
The back also carries a design decision that trips people up: reversals. If readers use reversed cards, a back with a clear top and bottom lets them tell upright from reversed, which some makers want and some deliberately avoid with a symmetrical back. That choice, plus how to keep a border from showing cutting error, is covered in designing your tarot card back.
Catch it before you pay
The expensive mistakes here are silent. A card that is 800 x 1400 instead of 825 x 1425, or sitting at 150 DPI, or missing its bleed, still opens, still previews, still looks like a tarot card on screen. You often find out only when the proof lands or the printer flags the batch, after you have already spent the money.
Foolmade reads the card files you already made and checks them against these real dimensions, resolution, bleed, and color expectations, so a wrong size or a missing-bleed file gets caught before it costs you a print run. It never prints your deck and it never generates art. It just tells you whether your numbers line up with the standard, or with the printer template you are targeting. You can run the print check on your deck before you order a single proof.
Frequently asked questions
What DPI for tarot cards?
300 DPI. That is the resolution nearly every card printer expects, and it is the minimum for crisp print. At 300 DPI a standard 2.75 x 4.75 inch card is 825 x 1425 pixels of visible art.
How much bleed do tarot cards need?
About 0.125 inches on each edge, roughly 37 to 38 pixels per side at 300 DPI. That makes a full-bleed standard tarot file about 897 x 1497 pixels. Always confirm the exact bleed against your printer's template.
What size are tarot cards?
The standard tarot card is 2.75 x 4.75 inches, or 70 x 121 mm. Poker size (2.5 x 3.5 in) is a common alternative, especially for oracle decks. Pick one size and hold all 78 cards to it.
Do I need to convert my cards to CMYK before printing?
Usually no. Most card printers want an sRGB upload and convert to CMYK themselves. Only convert yourself if your printer's guidelines specifically ask for it.
What is the most common print-ready mistake?
Cards that are not all the same size. Decks get made across weeks in different files, and one card ends up at a different canvas size or DPI than the rest, which the printer catches after you have paid.